

By Julianna Evans, BM, MM, PMP
Do you ever open a box of reeds, but maybe two or three out of the 10 reeds work? In today’s blog, I’ll discuss how to balance your clarinet reeds so that they respond evenly across all registers and provide a consistent tone quality.
Balancing clarinet reeds is an essential aspect of clarinet playing that’s not always a primary focus in private lessons. It takes some time and practice to understand how to make adjustments, but it can really help with achieving a consistent tone. So why should you consider learning to balance your reeds?
Here are several reasons why balancing clarinet reeds is essential:
- Tone Quality: Balancing reeds ensures that each part of the reed vibrates evenly and contributes to a more beautiful and consistent tone.
- Response: Properly balanced reeds respond more quickly and predictably to the player’s This means you can articulate notes more precisely, which is crucial for playing fast passages or achieving dynamic contrast.
- Ease of Playing: A balanced reed is easier to play because it doesn’t require excessive effort to produce sound. This reduces fatigue and makes it more comfortable to play for extended periods.
So, what’s the main goal, and what are you looking for when you balance your clarinet reed?
- Equal Resistance: You want the reed to offer consistent resistance when you play throughout the entire range of the instrument. This means the reed should not feel significantly harder or softer in different registers.
- Tone Quality: Balancing ensures that the reed produces a uniform and desirable tone quality across different notes and dynamics. The goal is to avoid any abrupt changes in timbre or intonation.
- Stability: A balanced reed is less likely to warp or crack because it is subjected to uniform stress when played. This increases the reed’s longevity and reduces the need for frequent replacements.
We’re going to need some tools to balance reeds. There are many reed tools you could buy, but honestly, all you need is a piece of plexiglass (1/8-inch thick) for a flat service and 600 grit wet/dry sandpaper. These basic items should work well for making adjustments and you can find these supplies at any local hardware store.
Materials:
Sandpaper 600 grit: https://bit.ly/sandpaper600
Plexiglass 1/8 inch thick, 8×10: https://tinyurl.com/2kdcxhfr
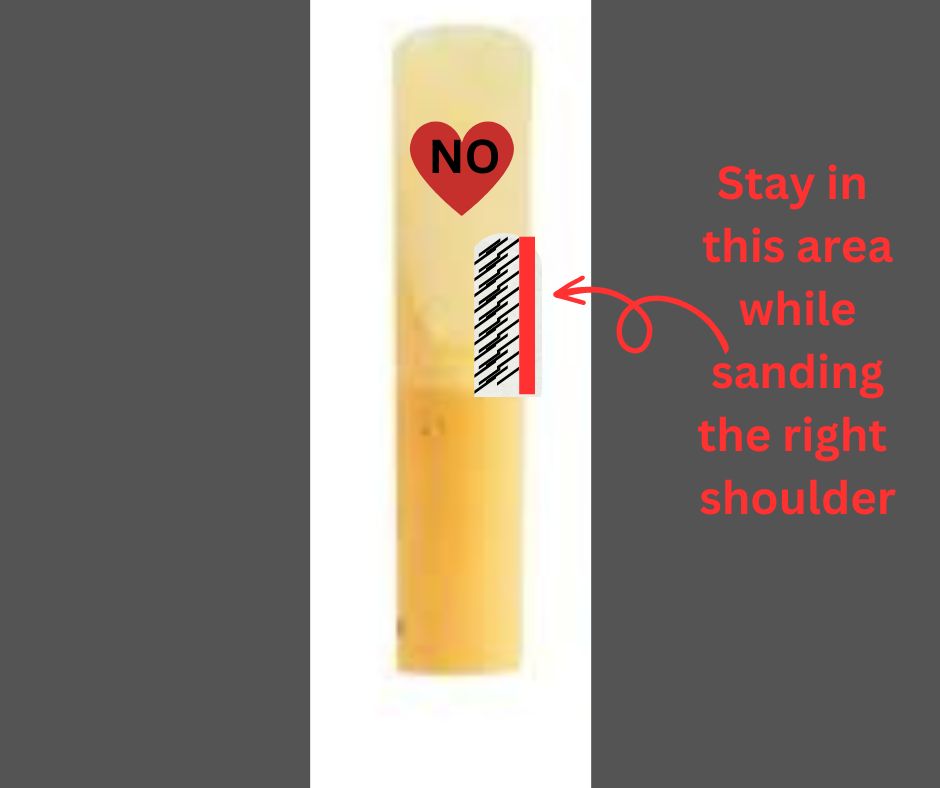
First, let’s take a look at a diagram of a reed. A good basic rule of thumb is to not touch the heart, tip, or spine of the reed. By working on the shoulders of the reeds we’re working on the thickest part of the reed and avoiding taking off too much wood as we adjust the reeds.

Next, we’re going to start with a simple play test by playing an open G and sustaining the note with the mouthpiece centered. Next, while sustaining the open G turn the mouthpiece to the Left and notice if it’s easier or harder to play on that side, then turn the mouthpiece to the Right while still sustaining the open G and notice if it’s easier or harder on that side.
Cheat Sheet:
If the reed responds best with the mouthpiece centered, then the reed is balanced. If it’s still hard for the reed to vibrate, try sanding an equal amount of wood off the right and left shoulders.
If the reed vibrates better when you turn to the LEFT (dampening the left side), that means that the right side is vibrating freely and you’ll want to sand down the LEFT shoulder of the reed to make the reed “balanced”.

If the reed vibrates better when you turn to the RIGHT (dampening the right side), that means that the left side is vibrating freely and you’ll want to sand down the RIGHT shoulder of the reed to make the reed “balanced”.
After you’re done making adjustments, put the reed back on the mouthpiece and run the same test: Open G-Center-Left-Right.
Once you feel comfortable with your reed adjustment you can move on to adjusting other reeds. Try to consider the following factors when evaluating the reed’s performance:
- Responsiveness: Does the reed respond well across all registers?
- Tone Quality: Is the tone bright, dark, or warm? Does it match your preferred sound?
- Intonation: Are the notes in tune with each other?
- Articulation: Can you articulate cleanly and control staccato and legato passages?
Remember that reed balancing requires patience and practice. It’s important to make small adjustments and frequently test the reed to avoid overcorrecting. Additionally, some players prefer to use a reed rush or a reed knife to help maintain balance after initial adjustments. Experiment with different methods and find what works best for you and your clarinet setup.
HERE is a link to a free resource on my website that takes you through the reed balancing process step-by-step. I also have an accompanying VIDEO on YouTube to help demonstrate some of these concepts.
Ciao for now!
💕Julianna
Discover more from Clarinet Note Studio
Subscribe to get the latest posts sent to your email.
